Most Oracle technology professionals who are interested in data
replication are familiar with Oracle Streams. Until 2009, Streams was
the recommended and most popular Oracle technology for data
distribution.
In July 2009, Oracle acquired GoldenGate, a
provider of database replication software. The company is now
encouraging its customers to use Oracle GoldenGate (which is part of the Oracle Fusion Middleware
family) for their data replication needs in new applications. Oracle's
statement of direction regarding Oracle Streams says that product “will
continue to be supported, but will not be actively enhanced.”
In
this article we will build a simple transaction replication example
using Oracle GoldenGate, in order to get acquainted with this new
technology.
Oracle GoldenGate Architecture
GoldenGate
v11 enables transaction level replication among heterogeneous
platforms. It supports Oracle Database, IBM DB2, Microsoft SQL Server,
MySQL, Teradata, and many other platforms. (It also supports access
through a generic ODBC driver.)
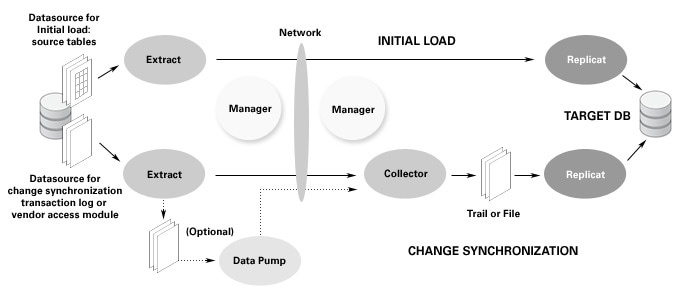
The most important components
that we need to be familiar with are the Extract and Replicat processes.
The Extract process runs at the source system and captures the data
changes. The Replicat is running at the target machine and is
responsible for applying the changes to the target database.
There
are two common configurations for the Extract process. The so called
“initial load” is used for populating the target database with an exact
copy of the source data (i.e. Extract is fetching all data from the
source database and typically runs only once). Then the “change
synchronization” can take place. In “change synchronization”
configuration the Extract is constantly monitoring the source database
and captures all changes on the fly.
In this demonstration we
will setup a Microsoft SQL Server 2008 as a source database, configure
and perform an initial load and then start an Extract process in a
change synchronization mode. In order to show that this replication is
truly heterogeneous, we will run SQL Server on Windows XP and Oracle
Database 11
g Release 2 on Oracle Linux 5. As a prerequisite I
will assume that you already have a clean installation of SQL Server
2008 on the Windows box and Oracle Database on the Linux machine.
We will start building the demonstration scenario by installing GoldenGate. Let's start with the Windows box.
GoldenGate for SQL Server Installation on Windows XP
First you need a copy of Oracle GoldenGate v11 for SQL Server. You can download it from http://edelivery.oracle.com
(Oracle Fusion Middleware → Microsoft Windows x32 → Oracle GoldenGate
for Non Oracle Database v11). The serial number of the media pack that
you need is V22241-01.
Extract the downloaded archive in a location where you want to have
the Oracle GoldenGate installation (in this example – C:\GG). Then open
a command prompt, go to the directory, and launch GGSCI (the GoldenGate
command interface):
C:\GG>ggsci
Oracle GoldenGate Command Interpreter for ODBC
Version 11.1.1.0.0 Build 078
Windows (optimized), Microsoft SQL Server on Jul 28 2010 18:55:52
Copyright (C) 1995, 2010, Oracle and/or its affiliates. All rights reserved.
GGSCI (MSSQL) 1>
Next execute the command
CREATE SUBDIRS to create the Oracle GoldenGate working directories.
GGSCI (MSSQL) 1> CREATE SUBDIRS
Creating subdirectories under current directory C:\GG
Parameter files C:\GG\dirprm: created
Report files C:\GG\dirrpt: created
Checkpoint files C:\GG\dirchk: created
Process status files C:\GG\dirpcs: created
SQL script files C:\GG\dirsql: created
Database definitions files C:\GG\dirdef: created
Extract data files C:\GG\dirdat: created
Temporary files C:\GG\dirtmp: created
Veridata files C:\GG\dirver: created
Veridata Lock files C:\GG\dirver\lock: created
Veridata Out-Of-Sync files C:\GG\dirver\oos: created
Veridata Out-Of-Sync XML files C:\GG\dirver\oosxml: created
Veridata Parameter files C:\GG\dirver\params: created
Veridata Report files C:\GG\dirver\report: created
Veridata Status files C:\GG\dirver\status: created
Veridata Trace files C:\GG\dirver\trace: created
Stdout files C:\GG\dirout: created
GGSCI (MSSQL) 2> EXIT
C:\GG>
According
to the official documentation GGSCI supports up to 300 concurrent
Extract and Replicat processes per Oracle GoldenGate instance. There is
however a single process that is responsible for controlling the other
processes; it's called the Manager process. Although you can run this
process manually it is a good practice to install it as service -
otherwise it will stop when the user that started it logs off.
To add the Manager process as a Windows service execute the
INSTALL ADDSERVICE command within the GoldenGate installation directory.
C:\GG>INSTALL ADDSERVICE
Service 'GGSMGR' created.
Install program terminated normally.
C:\GG>
This pretty much completes the Windows installation. Let's move on to the Linux machine.
GoldenGate for Oracle Installation on Oracle Linux 5
Installing Oracle GoldenGate on Linux is not much different than the
installation that you did on top of Windows XP. You will need to
download the media pack of GoldenGate for Oracle on Linux (V22228-01).
You create an installation directory and unzip the archive there. In
this example, I use the /u01/app/oracle/gg directory, as our ORACLE_BASE
is pointing to /u01/app/oracle. After this is done you have to set the
PATH and LD_LIBRARY_PATH environment variables like this:
[oracle@oradb ~]$ export PATH=$PATH:$ORACLE_BASE/gg
[oracle@oradb ~]$ export LD_LIBRARY_PATH=$ORACLE_HOME/lib:$ORACLE_BASE/gg
Let's start GGSCI and execute
CREATE SUBDIRS.
[oracle@oradb ggs]$ cd $ORACLE_BASE/gg
[oracle@oradb gg]$ ./ggsci
Oracle GoldenGate Command Interpreter for Oracle
Version 11.1.1.0.0 Build 078
Linux, x86, 32bit (optimized), Oracle 11 on Jul 28 2010 13:22:25
Copyright (C) 1995, 2010, Oracle and/or its affiliates. All rights reserved.
GGSCI (oradb) 1> CREATE SUBDIRS
Creating subdirectories under current directory /u01/app/oracle/gg
Parameter files /u01/app/oracle/gg/dirprm: created
Report files /u01/app/oracle/gg/dirrpt: created
Checkpoint files /u01/app/oracle/gg/dirchk: created
Process status files /u01/app/oracle/gg/dirpcs: created
SQL script files /u01/app/oracle/gg/dirsql: created
Database definitions files /u01/app/oracle/gg/dirdef: created
Extract data files /u01/app/oracle/gg/dirdat: created
Temporary files /u01/app/oracle/gg/dirtmp: created
Veridata files /u01/app/oracle/gg/dirver: created
Veridata Lock files /u01/app/oracle/gg/dirver/lock: created
Veridata Out-Of-Sync files /u01/app/oracle/gg/dirver/oos: created
Veridata Out-Of-Sync XML files /u01/app/oracle/gg/dirver/oosxml: created
Veridata Parameter files /u01/app/oracle/gg/dirver/params: created
Veridata Report files /u01/app/oracle/gg/dirver/report: created
Veridata Status files /u01/app/oracle/gg/dirver/status: created
Veridata Trace files /u01/app/oracle/gg/dirver/trace: created
Stdout files /u01/app/oracle/gg/dirout: created
GGSCI (oradb) 2> EXIT
[oracle@oradb gg]$
Installation on the Linux machine is now completed.
Preparing the Source Database
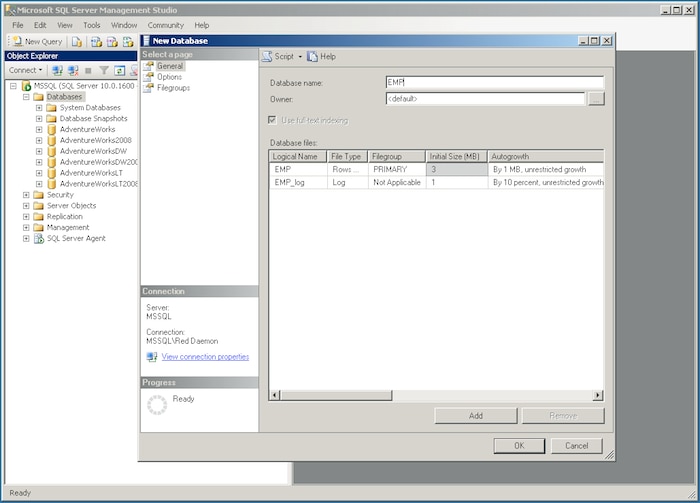
Next step is to create a new database in SQL Server and populate it
with some sample data. The name of the database will be EMP. You can
create it by launching SQL Server Management Studio, right-clicking on
Databases, and selecting
New Database.
Type EMP in the database name field and click OK, leaving all other options by default.
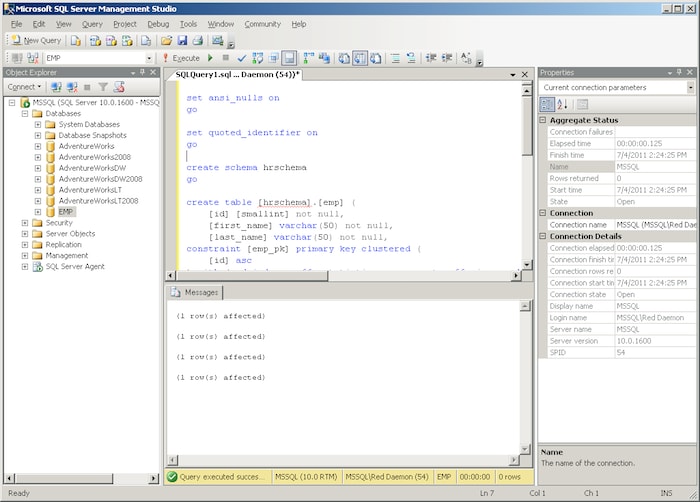
Let's
add a new database schema (HRSCHEMA), a table (EMP) and a few test
records in the newly created database. This will be accomplished by
running the following SQL:
set ansi_nulls on
go
set quoted_identifier on
go
create schema hrschema
go
create table [hrschema].[emp] (
[id] [smallint] not null,
[first_name] varchar(50) not null,
[last_name] varchar(50) not null,
constraint [emp_pk] primary key clustered (
[id] asc
) with (pad_index = off, statistics_norecompute=off, ignore_dup_key=off, allow_row_locks=on, allow_page_locks=on) on [primary]
) on [primary]
go
-- TEST DATA
INSERT INTO [hrschema].[emp] ([id], [first_name], [last_name]) VALUES (1,'Dave','Mustaine')
INSERT INTO [hrschema].[emp] ([id], [first_name], [last_name]) VALUES (2,'Chris','Broderick')
INSERT INTO [hrschema].[emp] ([id], [first_name], [last_name]) VALUES (3,'David','Ellefson')
INSERT INTO [hrschema].[emp] ([id], [first_name], [last_name]) VALUES (4,'Shawn','Drover')
GO
First create a new query (by right-clicking on the database name and selecting
New Query). Then paste-in the SQL text above and hit F5 to execute it.
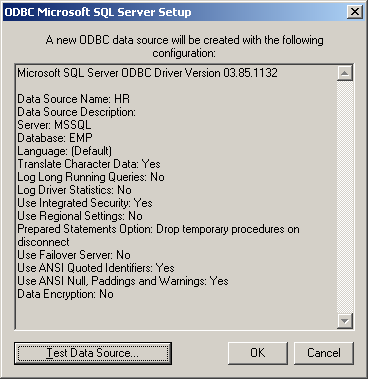
Now,
in order for Oracle GoldenGate to be able to access the EMP database,
you have to create an ODBC data source for it. Let's go to
Control Panel -> Administrative Tools -> Data Sources (ODBC) and add a new System DSN. Select
SQL Server
as the database driver and name the data source HR. You point the
source to the local SQL Server (MSSQL) and fill in the login
credentials. The data source summary should be similar to this:
Now
it's time to enable Oracle GoldenGate to acquire the transaction
information for the EMP table from the transaction logs. Again you will
be using GGSCI:
C:\GG>ggsci.exe
Oracle GoldenGate Command Interpreter for ODBC
Version 11.1.1.0.0 Build 078
Windows (optimized), Microsoft SQL Server on Jul 28 2010 18:55:52
Copyright (C) 1995, 2010, Oracle and/or its affiliates. All rights reserved.
GGSCI (MSSQL) 1> DBLOGIN SOURCEDB HR
Successfully logged into database.
GGSCI (MSSQL) 2> ADD TRANDATA HRSCHEMA.EMP
Logging of supplemental log data is enabled for table hrschema.emp
GGSCI (MSSQL) 3>
Because
the data types in Oracle and SQL Server are different you have to
establish a data type conversion. GoldenGate provides a dedicated tool
called DEFGEN that generates data definitions and is referenced by
Oracle GoldenGate processes when source and target tables have
dissimilar definitions. Before running DEFGEN you have to create a
parameter file for it, specifying which tables should the tool inspect
and where to place the type definitions file after the tables are
inspected. You can create such a parameter file using the EDIT PARAMS
command within GGSCI.
GGSCI (MSSQL) 3> EDIT PARAMS DEFGEN
GGSCI (MSSQL) 4>
This
creates an empty parameter file named DEFGEN.PRM and located in the
DIRPRM folder of your GoldenGate installation. Put the following
contents inside the file:
defsfile c:\gg\dirdef\emp.def
sourcedb hr
table hrschema.emp;
The
parameters are pretty self explanatory. We want DEFGEN to inspect the
EMP table inside the HRSCHEMA and to place a definitions file named
EMP.DEF in the DIRDEF sub-directory. Let's invoke DEFGEN and examine its
output.
C:\GG>defgen paramfile c:\gg\dirprm\defgen.prm
***********************************************************************
Oracle GoldenGate Table Definition Generator for ODBC
Version 11.1.1.0.0 Build 078
Windows (optimized), Microsoft SQL Server on Jul 28 2010 19:16:56
Copyright (C) 1995, 2010, Oracle and/or its affiliates. All rights reserved.
Starting at 2011-04-08 14:41:06
***********************************************************************
Operating System Version:
Microsoft Windows XP Professional, on x86
Version 5.1 (Build 2600: Service Pack 3)
Process id: 2948
***********************************************************************
** Running with the following parameters **
***********************************************************************
defsfile c:\gg\dirdef\emp.def
sourcedb hr
table hrschema.emp;
Retrieving definition for HRSCHEMA.EMP
Definitions generated for 1 tables in c:\gg\dirdef\emp.def
C:\GG>
If you bother to check the contents of EMP.DEF it will be something similar to this:
*
* Definitions created/modified 2011-07-07 10:27
*
* Field descriptions for each column entry:
*
* 1 Name
* 2 Data Type
* 3 External Length
* 4 Fetch Offset
* 5 Scale
* 6 Level
* 7 Null
* 8 Bump if Odd
* 9 Internal Length
* 10 Binary Length
* 11 Table Length
* 12 Most Significant DT
* 13 Least Significant DT
* 14 High Precision
* 15 Low Precision
* 16 Elementary Item
* 17 Occurs
* 18 Key Column
* 19 Sub Data Type
*
*
Definition for table HRSCHEMA.EMP
Record length: 121
Syskey: 0
Columns: 3
id 134 23 0 0 0 1 0 8 8 8 0 0 0 0 1 0 1 0
first_name 64 50 11 0 0 1 0 50 50 0 0 0 0 0 1 0 0 0
last_name 64 50 66 0 0 1 0 50 50 0 0 0 0 0 1 0 0 0
End of definition
It basically lists all tables/columns and describes the native database types using a more general definitions.
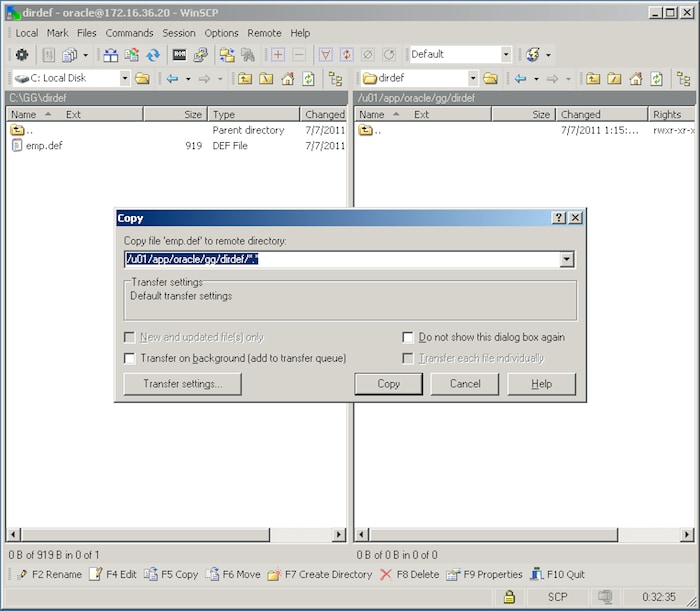
Now
you have to copy the EMP.DEF file to the target machine as it should be
available to the Replicat process. The Replicat will have to do another
conversion. It will map the more general types back to database
specific types (but this time the types will correspond to the ones used
by the target database). For copying the file you can use FTP/SFTP or
SCP transfer. (Personally I am using a free FTP/SFTP/SCP client called
WinSCP to copy EMP.DEF from the Windows box to the
/u01/app/oracle/gg/dirdef folder on the Linux machine.)
Preparing the Target Database
After the source preparations are finalized it's time to move to the
target machine. Let's create a schema (GG_USER) and a table where the
Replicat process can apply the transactions coming from the source.
[oracle@oradb ~]$ sqlplus / as sysdba
SQL*Plus: Release 11.2.0.1.0 Production on Fri Apr 8 14:11:49 2011
Copyright (c) 1982, 2009, Oracle. All rights reserved.
Connected to:
Oracle Database 11g Enterprise Edition Release 11.2.0.1.0 - Production
With the Partitioning, OLAP, Data Mining and Real Application Testing options
SQL> create user gg_user identified by welcome1;
User created.
SQL> grant connect, resource,select any dictionary to gg_user;
Grant succeeded.
SQL>
The EMP table should reside in GG_USER's schema:
SQL> create table gg_user.emp (id number not null, first_name varchar2(50), last_name varchar2(50));
Table created.
SQL>
You
have to keep in mind that should the Replicat process apply data to
tables residing in different schemas, GG_USER will need additional
privileges (like SELECT ANY TABLE, LOCK ANY TABLE etc.). A detailed list
of the required privileges is listed in the official documentation.
Setting Up the Extract & Replicat for Initial Data Load
Let's start by setting up the Extract process on the source machine.
Name the process INEXT (for INitial EXTract). Next create a parameters
file in the same manner as the parameter file that you created for the
DEFGEN utility. The filename will be INEXT.PRM.
C:\GG>ggsci.exe
Oracle GoldenGate Command Interpreter for ODBC
Version 11.1.1.0.0 Build 078
Windows (optimized), Microsoft SQL Server on Jul 28 2010 18:55:52
Copyright (C) 1995, 2010, Oracle and/or its affiliates. All rights reserved.
GGSCI (MSSQL) 1> EDIT PARAMS INEXT
Paste the following contents to INEXT.PRM:
SOURCEISTABLE
SOURCEDB HR
RMTHOST ORADB, MGRPORT 7809
RMTFILE /u01/app/oracle/gg/dirdat/ex
TABLE hrschema.emp;
The
SOURCEISTABLE parameter instructs the Extract process to get the data
directly from the table instead of the transaction logs. This is the
behavior that we want in order to do a full extraction. SOURCEDB points
to the database that contains the data. RMTHOST and MGRPORT specify the
remote machine and Manager's port. RMTFILE specifies the file to which
the extracted data will be written.
That's all the configuration
you need for the initial data extraction. Let's move to the Linux
machine and configure the initial data loading.
You have to deal with the Manager process first: Start GGSCI and create a parameter file called MGR.PRM.
[oracle@oradb gg]$ ./ggsci
Oracle GoldenGate Command Interpreter for Oracle
Version 11.1.1.0.0 Build 078
Linux, x86, 32bit (optimized), Oracle 11 on Jul 28 2010 13:22:25
Copyright (C) 1995, 2010, Oracle and/or its affiliates. All rights reserved.
GGSCI (oradb) 1> EDIT PARAM MGR
There is only one line that you have to put in MGR.PRM:
PORT 7809
After saving the file execute the START MANAGER command within GGSCI and see if the manager starts correctly.
GGSCI (oradb) 2> START MANAGER
Manager started.
GGSCI (oradb) 3>
Next
you have to set the parameters for the Replicat process. So create a
new parameters file and name it INLOAD (for INitial LOADing).
GGSCI (oradb) 3> EDIT PARAMS INLOAD
Put the following contents inside INLOAD.PRM:
SPECIALRUN
END RUNTIME
USERID gg_user, PASSWORD welcome1
EXTFILE /u01/app/oracle/gg/dirdat/ex
SOURCEDEFS /u01/app/oracle/gg/dirdef/emp.def
MAP hrschema.emp, TARGET gg_user.emp;
The
SPECIALRUN parameter defines an initial-loading process (it is a
one-time loading that doesn't use checkpoints). The next line of the
file instructs the Replicat process to terminate after the loading is
finished.
Next you provide the database user and password, the
extract file, and the table definition. The final parameter, MAP,
instructs the Replicat to remap the table HRSCHEMA.EMP to GG_USER.EMP.
Running the Initial Extract and Loading
The
databases and processes are finally configured. Now you can start the
initial loading and see the data replication in action.
First you
have to run the Extract process; it will fetch all data residing at the
SQL Server's EMP table and write it to the RMTFILE
(/u01/app/oracle/gg/dirdat/ex) at the Linux host.
Start the Extract by running the EXTRACT command and providing parameters and log file as command line arguments.
C:\GG>extract paramfile dirprm\inext.prm reportfile dirrpt\inext.rpt
***********************************************************************
Oracle GoldenGate Capture for ODBC
Version 11.1.1.0.0 Build 078
Windows (optimized), Microsoft SQL Server on Jul 28 2010 19:22:00
Copyright (C) 1995, 2010, Oracle and/or its affiliates. All rights reserved.
Starting at 2011-04-08 15:57:48
***********************************************************************
Operating System Version:
Microsoft Windows XP Professional, on x86
Version 5.1 (Build 2600: Service Pack 3)
Process id: 556
Description:
***********************************************************************
** Running with the following parameters **
***********************************************************************
2011-04-08 15:57:48 INFO OGG-01017 Wildcard resolution set to IMMEDIATE bec
ause SOURCEISTABLE is used.
Using the following key columns for source table HRSCHEMA.EMP: id.
CACHEMGR virtual memory values (may have been adjusted)
CACHEBUFFERSIZE: 64K
CACHESIZE: 1G
CACHEBUFFERSIZE (soft max): 4M
CACHEPAGEOUTSIZE (normal): 4M
PROCESS VM AVAIL FROM OS (min): 1.85G
CACHESIZEMAX (strict force to disk): 1.62G
Database Version:
Microsoft SQL Server
Version 10.00.1600
ODBC Version 03.52.0000
Driver Information:
SQLSRV32.DLL
Version 03.85.1132
ODBC Version 03.52
Database Language and Character Set:
Warning: Unable to determine the application and database codepage settings.
Please refer to user manual for more information.
2011-04-08 15:57:49 INFO OGG-01478 Output file /u01/app/oracle/gg/dirdat/ex
is using format RELEASE 10.4/11.1.
2011-04-08 15:57:55 INFO OGG-01226 Socket buffer size set to 27985 (flush s
ize 27985).
Processing table HRSCHEMA.EMP
***********************************************************************
* ** Run Time Statistics ** *
***********************************************************************
Report at 2011-04-08 15:57:55 (activity since 2011-04-08 15:57:49)
Output to /u01/app/oracle/gg/dirdat/ex:
From Table HRSCHEMA.EMP:
# inserts: 4
# updates: 0
# deletes: 0
# discards: 0
C:\GG>
The run time statistics shows that 4 rows were successfully extracted. Let's move to the Linux machine and start the Replicat.
To apply the extracted data to the target database, run the replicat
command and provide the prepared parameters file. Here is an excerpt
from the replicat run:
[oracle@oradb gg]$ ./replicat paramfile dirprm/inload.prm
***********************************************************************
Oracle GoldenGate Delivery for Oracle
Version 11.1.1.0.0 Build 078
Linux, x86, 32bit (optimized), Oracle 11 on Jul 28 2010 15:42:30
Copyright (C) 1995, 2010, Oracle and/or its affiliates. All rights reserved.
Starting at 2011-04-11 12:52:52
***********************************************************************
Operating System Version:
Linux
Version #1 SMP Mon Mar 29 20:06:41 EDT 2010, Release 2.6.18-194.el5
Node: oradb
Machine: i686
soft limit hard limit
Address Space Size : unlimited unlimited
Heap Size : unlimited unlimited
File Size : unlimited unlimited
CPU Time : unlimited unlimited
Process id: 23383
Description:
***********************************************************************
** Running with the following parameters **
***********************************************************************
SPECIALRUN
END RUNTIME
USERID gg_user, PASSWORD ********
EXTFILE /u01/app/oracle/gg/dirdat/ex
SOURCEDEFS /u01/app/oracle/gg/dirdef/emp.def
MAP hrschema.emp, TARGET gg_user.emp;
CACHEMGR virtual memory values (may have been adjusted)
CACHEBUFFERSIZE: 64K
CACHESIZE: 512M
CACHEBUFFERSIZE (soft max): 4M
CACHEPAGEOUTSIZE (normal): 4M
PROCESS VM AVAIL FROM OS (min): 1G
CACHESIZEMAX (strict force to disk): 881M
Database Version:
Oracle Database 11g Enterprise Edition Release 11.2.0.1.0 - Production
PL/SQL Release 11.2.0.1.0 - Production
CORE 11.2.0.1.0 Production
TNS for Linux: Version 11.2.0.1.0 - Production
NLSRTL Version 11.2.0.1.0 - Production
...
Reading /u01/app/oracle/gg/dirdat/ex, current RBA 1210, 4 records
Report at 2011-04-11 12:53:15 (activity since 2011-04-11 12:53:14)
From Table HRSCHEMA.EMP to GG_USER.EMP:
# inserts: 4
# updates: 0
# deletes: 0
# discards: 0
Last log location read:
FILE: /u01/app/oracle/gg/dirdat/ex
RBA: 1210
TIMESTAMP: 2011-04-08 16:57:55.433993
EOF: NO
READERR: 400
...
[oracle@oradb gg]$
You can login to the Oracle Database as GG_USER and check the contents of the EMP table.
SQL> select id, first_name from emp;
ID FIRST_NAME
---------- --------------------------------------------------
1 Dave
2 Chris
3 David
4 Shawn
SQL>
The EMP table now contains a copy of all records that were originally inserted at the SQL Server.
Live Data Capture Configuration
With
the Oracle database having an exact copy of the SQL Server's EMP table,
it is now time to create a live capture configuration. We will setup
the Extract and Replicat processes to run all the time and continuously
transmit/apply changes of the EMP table.
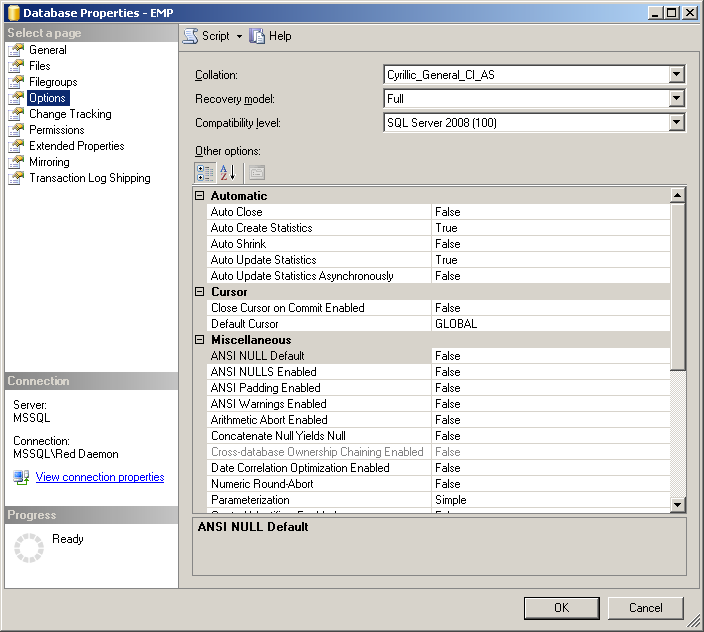
In order to implement
the new configuration you will have to create new parameter files for
extracting and replicating. First however you have to perform two
additional steps on SQL Server: Confirm that the database is set to
Full Recovery and then take a full database backup of the EMP database.
Failure to take a full backup will prevent the Extract process from
capturing live data changes.
You can easily check if the EMP database is in Full Recovery by right-clicking on it, selecting
Properties, and inspecting the value of Recovery model.
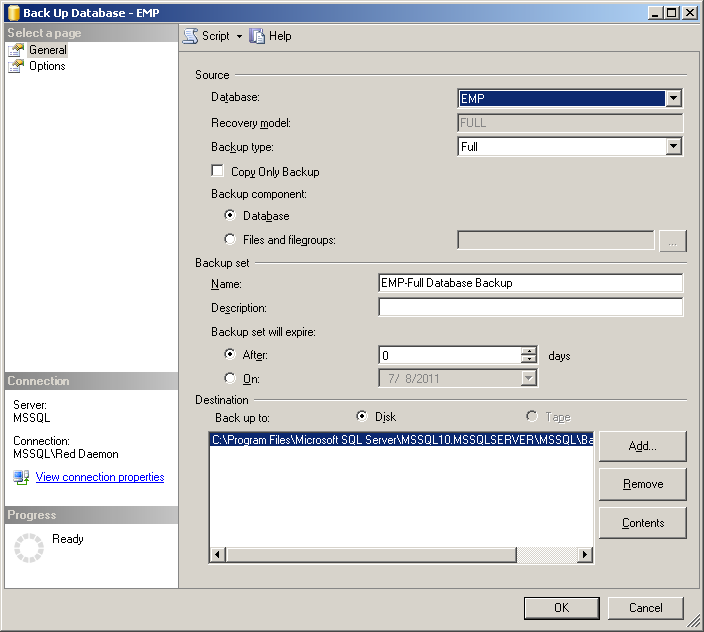
Taking a full backup is done in a few clicks as well. Right-click on the EMP database, select
Tasks and then
Back Up. This brings up the backup database dialog. We confirm that the Backup type is set to
Full and then click
OK.
If everything goes well in a couple of seconds we should see a notification that the operation is successful.
Time
to set the processes. We will start by configuring a Manager process on
the Windows machine. We skipped this step in the initial loading phase,
but in the new configuration that you are building the Extract process
must be running all the time. This requires an active manager process
that will perform resource management functions. You will follow the
same steps as with the Linux box configuration.
GGSCI (MSSQL) 1> EDIT PARAM MGR
GGSCI (MSSQL) 2>
Put a single line in MGR.PRM to set the port of the Manager instance.
PORT 7809
Then we start the Manager.
GGSCI (MSSQL) 2> START MANAGER
Starting Manager as service ('GGSMGR')...
Service started.
GGSCI (MSSQL) 3>
Let's
create a new extract group for mining the transaction logs and name it
MSEXT. Then set a destination where the data changes should be written
(/u01/app/oracle/gg/dirdat/ms).
GGSCI (MSSQL) 3> ADD EXTRACT MSEXT, TRANLOG, BEGIN NOW
EXTRACT added.
GGSCI (MSSQL) 4> ADD RMTTRAIL /u01/app/oracle/gg/dirdat/ms, EXTRACT MSEXT
RMTTRAIL added.
You will also need a new parameters file.
GGSCI (MSSQL) 5> EDIT PARAMS MSEXT
GGSCI (MSSQL) 6>
Type the following lines in it:
EXTRACT MSEXT
SOURCEDB HR
TRANLOGOPTIONS MANAGESECONDARYTRUNCATIONPOINT
RMTHOST ORADB, MGRPORT 7809
RMTTRAIL /u01/app/oracle/gg/dirdat/ms
TABLE HRSCHEMA.EMP;
The
difference here is that we are omitting the SOURCEISTABLE parameter and
introducing a new one: TRANLOGOPTIONS MANAGESECONDARYTRUNCATIONPOINT.
This options tells the Extract process to routinely check and delete the
CDC capture job, resulting in better performance and less occupied
space for captured data.
This is all you need on the source machine. Let's move on and configure the replication at the target.
On
the Linux box you have to start by creating a checkpoint table.
Checkpoints are used to store the current read/write positions of the
Extract and Replicat processes. They prevent loss of data and insure
that the processes can recover from faults (for example if the network
between the source and target machine goes down for a moment). Create a
table that holds checkpoints information by issuing the ADD CHECKPOINT
command at the target.
GGSCI (oradb) 1> DBLOGIN USERID gg_user, PASSWORD welcome1
Successfully logged into database.
GGSCI (oradb) 2> ADD CHECKPOINTTABLE gg_user.chkpt
Successfully created checkpoint table GG_USER.CHKPT.
GGSCI (oradb) 3>
Let's add a Replicat group and setup its parameters.
GGSCI (oradb) 3> ADD REPLICAT MSREP, EXTTRAIL /u01/app/oracle/gg/dirdat/ms, CHECKPOINTTABLE gg_user.chkpt
REPLICAT added.
GGSCI (oradb) 4> EDIT PARAMS MSREP
GGSCI (oradb) 5>
As a final step put the following lines in MSREP.PRM.
REPLICAT MSREP
SOURCEDEFS /u01/app/oracle/gg/dirdef/emp.def
USERID gg_user, PASSWORD welcome1
MAP hrschema.emp, TARGET gg_user.emp;
The configuration is now completed. Let's start the Extract and Replicat and do some testing.
Starting and Testing Online Transaction Replication
To start the Extract process, use GGSCI and execute the
START EXTRACT command.
GGSCI (MSSQL) 1> START EXTRACT MSEXT
Sending START request to MANAGER ('GGSMGR') ...
EXTRACT MSEXT starting
GGSCI (MSSQL) 2>
On the Linux machine use the
START REPLICAT command respectively.
GGSCI (oradb) 1> START REPLICAT MSREP
Sending START request to MANAGER ...
REPLICAT MSREP starting
GGSCI (oradb) 2>
Let's login as GG_USER and see the contents of the EMP table.
SQL> select id, first_name from emp;
ID FIRST_NAME
---------- --------------------------------------------------
1 Dave
2 Chris
3 David
4 Shawn
SQL>
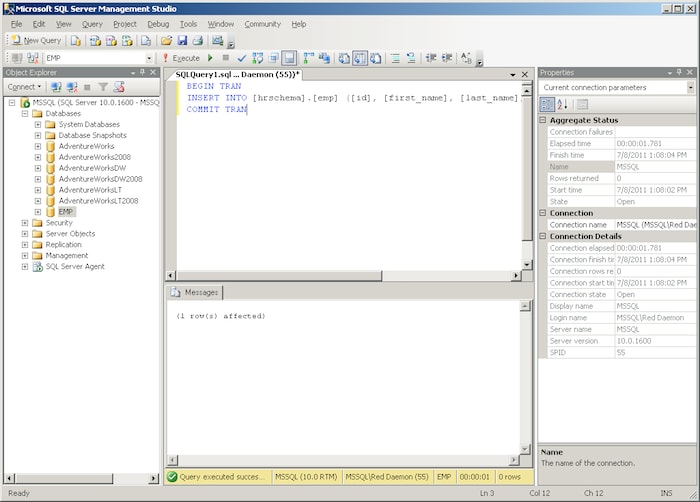
Nothing
new here. The data hasn't change since the last time we checked. Let's
go back to the SQL Server machine and run the following query, adding
one additional row to the EMP table at the source.
BEGIN TRAN
INSERT INTO [hrschema].[emp] ([id], [first_name], [last_name]) VALUES (9,'Gar','Samuelson')
COMMIT TRAN
Let's go back to the Oracle Database and see if anything changed there.
SQL> select id, first_name from emp;
ID FIRST_NAME
---------- --------------------------------------------------
1 Dave
2 Chris
3 David
4 Shawn
9 Samuelson
SQL>
Congratulations! The data is getting replicated in a sub-second interval, reflecting every single transaction.
Conclusion
In this article we performed a very basic demonstration of some of the
Oracle GoldenGate features. You should be aware that there are many
different topologies and usage scenarios. For instance, you can
configure GoldenGate to perform bidirectional replication (where two
different databases simultaneously replicate changes to each other).
There are also broadcast (where a single database replicates to multiple
targets) and consolidation (many databases replicate to a central
database) configurations. One can use GoldenGate to implement query
offloading (separating reporting from production, but avoiding the time
gap of the traditional data warehouses). It is also a powerful solution
for implementing zero downtime upgrades and database migrations.